Tuesday, September 19, 2006
Setting Up Your Development Environment
Many of new j2me programmers are probably wondering what they are going to do with a bunch of code. To be honest with you, when I started studying j2me programming, It took me a while to learn about the things I needed in order to see a MIDlet in action.
Installing the development tools
Although you can setup your development environment in several ways, I find this process really easy because you dont need to configure anything. Just follow the instructions and you'll get yourself started with programming in no time.
1. Download and install the J2SE SDK preferably version 1.4.2. You can download it here.
2. Download and install Eclipse IDE (I think you only need to unzip the archive file). You can get it here.
3. Download and install Nokia Carbide.j. It contains tools you can use to emulate various nokia specific devices. You can download it here.
Now this is the fun part.. Testing if you have properly configured your development tools. :D
Testing the installation
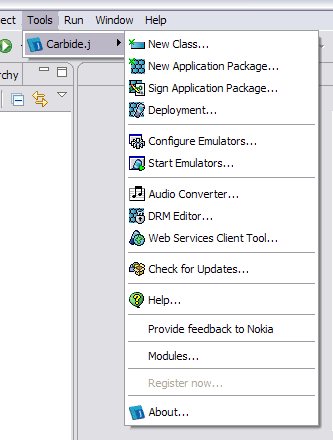
1. To check that you have successfully incorporated carbide.j with eclipse, make sure that there are carbide icon on the upper right part of your window and a "carbide.j" option under the Tools menu exist. Take a look at the following images:
Fig 1 - Carbide.j icons

Fig 2 - Carbide.j menu item
2. Create a new MIDP Project ( File > New > Project > Java > MIDP Project (Nokia SDK Plug-in). Just follow the follow the images:
Fig 3 - Choose MIDP Project (Nokiad SDK Plugin).
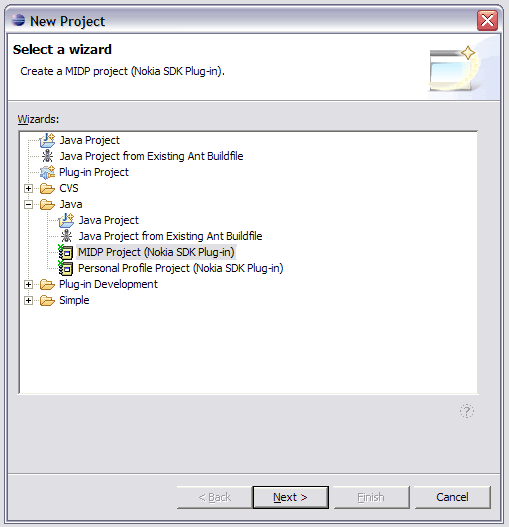
Fig 4 - Name your project.
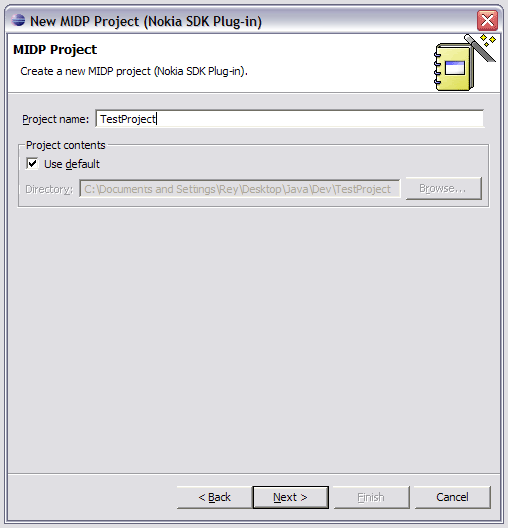
Fig 5 - Choose an emulator you want to use.
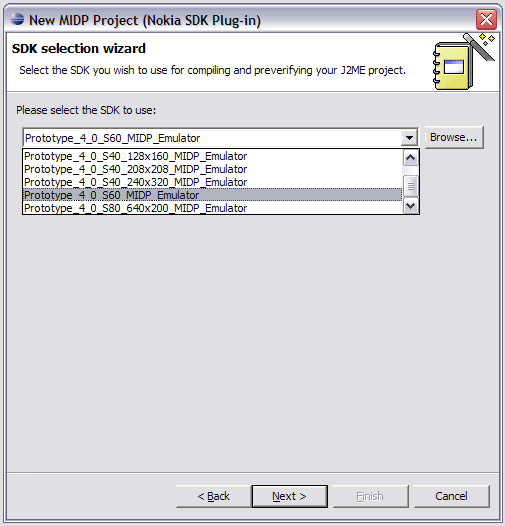
Fig 6 - Disable the "Start with designer tool" option. We wont be using it here.
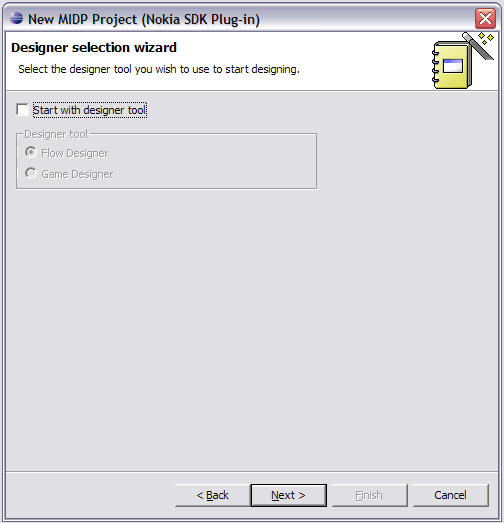
Fig 7 - Click finish.
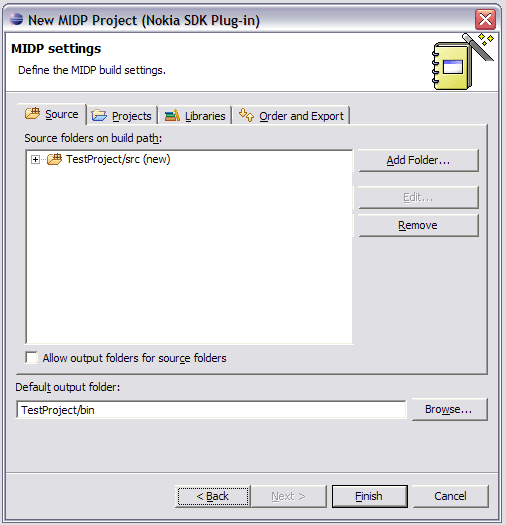
2. Lets create a MIDlet. Create a class file and name it 'MyMidlet'. Just copy the following code:
3. Lets create the canvas. Create a class file and name it 'MyCanvas'. Just copy the following code:
4. Run the application by clicking the "Run MIDlets on emulator" icon (see Fig 1). Note that you need to highlight the MyMidlet.java file on the package explorer so that the "Emulate" button is not disabled when you start your emulator. Take a look at the image below:
Fig 9 - Running the emulator.
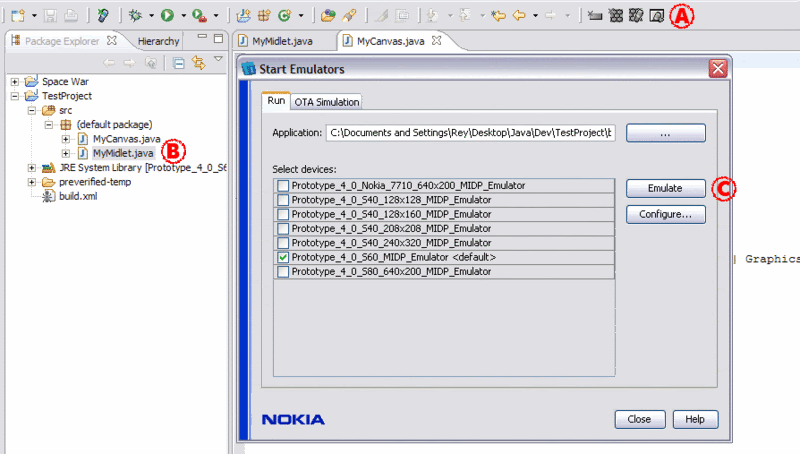
A = The button you need to click to start the emulator.
B = You need to highlight the MIDlet of your application so that the "Emulate" Button is not disabled.
C = Click emulate to start the emulator.
5. You'll see an output that looks like this one:
Fig 9 -The output.

Installing the development tools
Although you can setup your development environment in several ways, I find this process really easy because you dont need to configure anything. Just follow the instructions and you'll get yourself started with programming in no time.
1. Download and install the J2SE SDK preferably version 1.4.2. You can download it here.
2. Download and install Eclipse IDE (I think you only need to unzip the archive file). You can get it here.
3. Download and install Nokia Carbide.j. It contains tools you can use to emulate various nokia specific devices. You can download it here.
Now this is the fun part.. Testing if you have properly configured your development tools. :D
Testing the installation
1. To check that you have successfully incorporated carbide.j with eclipse, make sure that there are carbide icon on the upper right part of your window and a "carbide.j" option under the Tools menu exist. Take a look at the following images:
Fig 1 - Carbide.j icons
Fig 2 - Carbide.j menu item

2. Create a new MIDP Project ( File > New > Project > Java > MIDP Project (Nokia SDK Plug-in). Just follow the follow the images:
Fig 3 - Choose MIDP Project (Nokiad SDK Plugin).

Fig 4 - Name your project.

Fig 5 - Choose an emulator you want to use.

Fig 6 - Disable the "Start with designer tool" option. We wont be using it here.

Fig 7 - Click finish.

2. Lets create a MIDlet. Create a class file and name it 'MyMidlet'. Just copy the following code:
import javax.microedition.midlet.*;
import javax.microedition.lcdui.Display;
public class MyMidlet extends MIDlet {
private MyCanvas myCanvas;
public MyMidlet() {
myCanvas = new MyCanvas();
}
protected void startApp() throws MIDletStateChangeException {
Display.getDisplay(this).setCurrent(myCanvas);
}
protected void pauseApp() {
}
protected void destroyApp(boolean u) throws MIDletStateChangeException {
}
}
3. Lets create the canvas. Create a class file and name it 'MyCanvas'. Just copy the following code:
import javax.microedition.lcdui.Graphics;
import javax.microedition.lcdui.Canvas;
public class MyCanvas extends Canvas {
public MyCanvas() {
this.setFullScreenMode(true);
}
public void paint(Graphics g ) {
g.setColor(0,0,0);
g.fillRect(0, 0, getWidth(), getHeight());
g.setColor(255,255,255);
g.drawString("Hello World of J2ME", 10, 10, Graphics.LEFT | Graphics.TOP);
}
}
4. Run the application by clicking the "Run MIDlets on emulator" icon (see Fig 1). Note that you need to highlight the MyMidlet.java file on the package explorer so that the "Emulate" button is not disabled when you start your emulator. Take a look at the image below:
Fig 9 - Running the emulator.

A = The button you need to click to start the emulator.
B = You need to highlight the MIDlet of your application so that the "Emulate" Button is not disabled.
C = Click emulate to start the emulator.
5. You'll see an output that looks like this one:
Fig 9 -The output.

Comments:
<< Home
Hi,
i want to read sms from my nokia 5300 from a custom desktop application developed in java/.net. How can i read the sms from my computer?
Thanks
Rao
Post a Comment
i want to read sms from my nokia 5300 from a custom desktop application developed in java/.net. How can i read the sms from my computer?
Thanks
Rao
<< Home

